
Is your beloved Roomba started to behave oddly and make some weird sounds?
Is it a grinding or clicking sound?
I hear your pain (so to speak..)
Sometimes, whilst cleaning, your Roomba might sound louder depending on the type of floor that it is cleaning.
But if you think that the noise is louder than usual you should firstly check that the floor has no debris on it and then check the brushes for any blockages.
I this post, I list five possible causes of the noise and offer at least one solution for each noise.
But before I dive into that, let me first explain about how loud Roombas are.
Why is my Roomba so loud?
Your Roomba will slightly different depending on the floor surface that it is cleaning. No matter what the model, your Roomba will sound quieter when it is vacuuming carpet compared to when it is vacuuming a hardwood floor.
It will probably sound loudest when it is running on tiled floors.
In this sense Roombas are no different to any cylinder or stick vacuum- carpet is softer and there is more material to absorb the noise compared to a hardwood or tiled floor.
We all like numbers and here are a few for you.
Most Roomba vacuums have a noise level between 60 decibels (db) and 70 db. But what does that mean?
Normal conversations and dishwashers operate about about 60 db whereas 70gb is the same level of noise generated by a car outside your house.
So trying to watch TV or listen to the radio are two activities you should probably avoid if your Roomba is active.
Then there are differences in the sounds that different models make.
For instance, the 960 has five times the suction power of the Roomba 600, whilst the 980 has ten times. More power means more noise, I’m afraid.
Then there is the noise of the different functions of Roombas.
For instance the spot cleaning function of some of the earlier models may sound louder because the machines are cleaning in one small concentrated area as opposed to moving around a bigger area.
And of course, your Roomba will sound louder when it isn’t working properly…
Cause 1: Clean the Brushes or Extractor
If your Roomba is making a thumping or clicking noise, it is because the brushes (on Roombas up to 600 series) rubber extractors (on Roombas up to 800 series) cannot turn.
What are the brushes and extractors?
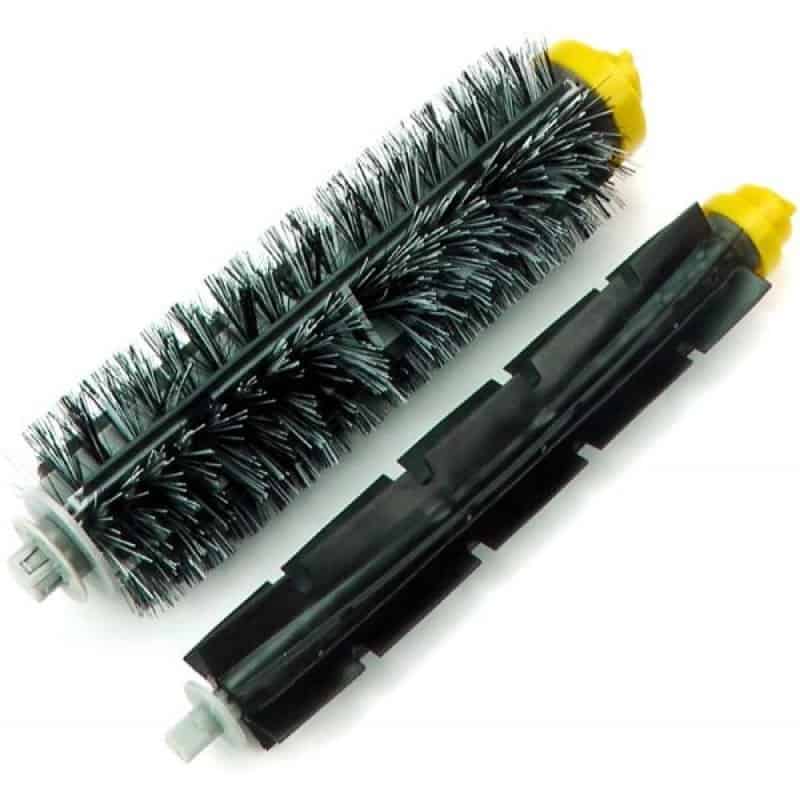
No matter which model of Roomba you own, each one has two cylinder or rollers near the base.
Up until the 600 series (4th generation of Roombas), the rollers were covered in bristles.
And they look like this
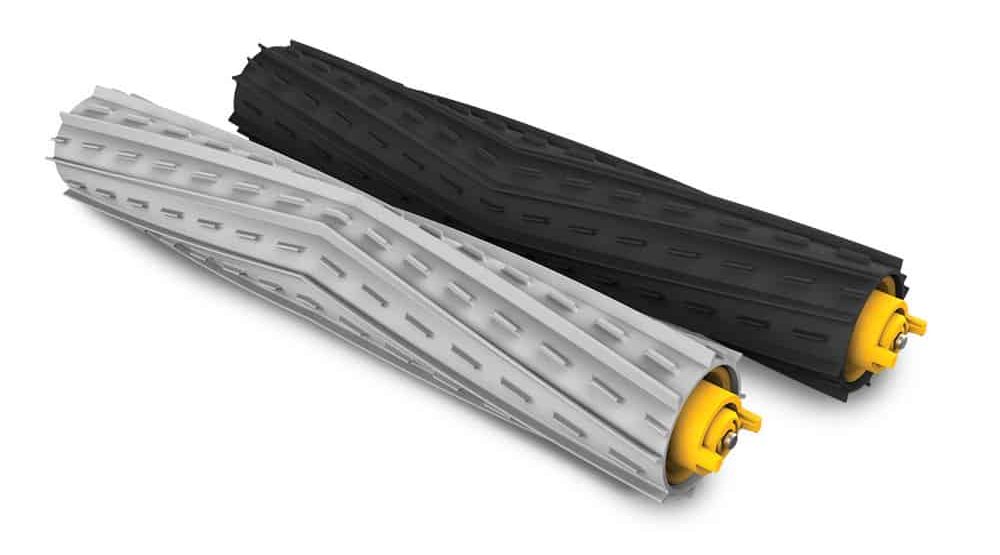
From the 800 series on they were made of rubber and had a pattern on the outside, a bit like you would find on a car or bike tyre.
These look like this:
But regardless of which series of Roomba you own, the thumping or clicking noise is because the brushes and extractors cannot turn.
And they need to be cleaned.
Here is a video to show how to clean a 600 series Roomba. But it is the same for any earlier generation as well.
If another of your issues with your Roomba is that it fails to cleaning all the rooms in your house, then please read this.
How to Clean a 600 Series Roomba
There are six steps to cleaning the brushes, which I have outlined below.
This is a very simple process which should take you no more than a couple of minutes to complete.
Step 1. Remove the brush guard by pushing down on both yellow tabs
Step 2: Remove the bristle brush and flexible beater brush from the cleaning head.
Step 3: Remove the yellow brush bearings and clean around and under them
Step 4: Use the cleaning tool to easily remove hair from the bristle brush
Step 5: Replace to brush bearing back onto the brush
Step 6: Reinstall the brushes making sure that the brushes are in place and close the brush guard.
How to Clean an 800 Series Roomba
There are five steps to cleaning the extractors, which I have outlined below.
This is a very simple process which should take you no more than a couple of minutes to complete.
Step 1: Pinch the yellow extractor frame release tabs and then lift the extractor frame.
Step 2: Remove the debris extractors and the yellow debris extractor caps
Step 3: Remove any hair or debris that has collected around the caps or metal axles.
Step 4: Remove hair and debris from the plastic caps on the other side of the extractors
Step 5: Replace the extractors into the frame and then close the frame.
Hopefully once you have finished cleaning your brushes or your extractors, your Roomba will no longer be making any grinding or crunching noises.
But, if the noise continues, you will have to look elsewhere.
And the first place to look is deep inside the brush or the extractor.
Cause 2: Trapped Dirt Within the Brush or Extractor
This is a video made by the owner of a Roomba 560 which is making a horrible grinding noise.
And the solution is not just to clean the outside of one of the brushes, it to disassemble it and clean the inside of it.
Also, it is worth pointing out that although the Roomba in the video is a 560, the solution could work for any model of Roomba that has brushes and not excavators.
Which is any model prior to the 800 series.
I have deliberately started this video almost halfway through because it is only at this point that the real problem and solution are explained.
In the video the owner tries to fix the grinding noise by just cleaning the outside of the brush- which is the solution outlined in cause 1 above.
But this did not cure the grinding noise and neither did removing a yellow bracket.
It wasn’t until two screws under the yellow bracket were taken out to reveal a brass spindle.
Around which was another big pile of “gunk”.
Once this was cleaned and everything was put back together, the Roomba worked and there was no grinding noises to be heard.
The third cause could be because a fault within your vacuum impeller.
Cause 3: Faulty Vacuum Impeller
You what?
The vacuum impeller is the a little motorised fan that sits within your Roomba’s bin and creates suction to collect any dirt or debris.
And I need to be honest with you, this is not a simple fix.
And depending on the age of your Roomba, I suggest two courses of action.
Plan A: If your Roomba is still under warranty
Contact Roomba support and explain about the noise that your Roomba makes and that you have cleaned the extractors by following the steps in their video.
Explain that after a lot of research you think that it could be vacuum impeller and could they send you a new dustbin unit for your device.
Plan B: If your Roomba is out of warranty.
You can try and fix the vacuum impeller in your Roomba.
But this is not simple and you should only attempt if you are willing to accept that in trying to fix it, it might make your Roomba worse.
You can find a step by step written and photo guide, here.
Cause 4: Extractors Rubbing Together
The fourth possible cause of your Roomba making a grinding noise is that your extractors are rubbing together.
This only applies to Roomba models from the 800 series and above as these are the models where cylindrical brushes were replaced by rubber extractors.
An easy way to test if it is the extractors rubbing together, is to take the extractors out and start your Roomba up.
If the noise stops, it must be because of the extractors.
The issue seems to be that in order for a Roomba to work as efficiently as possible, the gap between the two extractors is very small.
This problem seems to affect owners who have recently bought and fitted replacement extractors.
And the solution? Wait for the extractors to wear each other down.
Cause 5: Remove and clean the cleaning head
The next cause of the grinding noise could be related to the cleaning head.
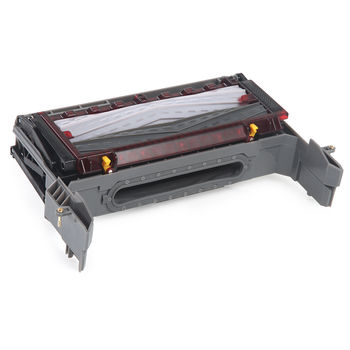
And to clarify, the cleaning head is the bracket that the excavators or brushes sit in.
Make sure that you have looked at cause #1 and #4 before you try this one.
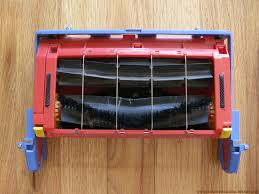
The cleaner head for the 800 series looks like this
And for a 500 series, it looks like this
To tell you the truth, there is not a lot of information about how to clean a cleaning head.
Instead, there are a few videos (such as this one and this one) that walk you through how to replace the cleaning head.
But a quick look online shows that a new cleaning head can cost anything from $60 -$80.
And so you might want to see if you can take your cleaning head out and disassemble it and clean out any dirt from inside it before you think about buying a new one.
But sorry to be so dull and repetitive but if you do try this be left in no doubt that it will invalidate your warranty!
The one step by step guide to not only removing a Roomba cleaning head but cleaning it out as well is this one.
This photo and text guide is for a 500 series Roomba.
Although the procedure is quite involved as long as you have a Phillips screwdriver with a fairly small head and a little patience, you should be fine.
As the guide clearly states, once you have revealed the gears/ cogs, just clean them one by one so that you do not them back in the wrong place.
To finish this article, I want to go through another set of noises and that you might hear coming from your Roomba.
Your Roomba can use a whole range of beeps and words to inform you about things that are going wrong with it- errors which it wants you to fix
Why does my Roomba beep?
Like any other vacuum, Roombas make a range of noises.
We all know what a vacuum cleaner sounds like when it is working properly and when it isn’t.
None of us need to be rocket scientists to work out when a Roomba has sucked up something it shouldn’t or when it has wedged itself under a piece of furniture.
In addition to these noises, Roombas use a range of beeps and sometimes words to let us know when things need fixing now.
I have created a chart to highlight the basic “noise” messages.
| Beeps | Spoken Message | Cause |
| 1 beep | “Error 1” | Roomba is stuck or a wheel is not in contact with the ground |
| 2 beeps | “Error 2” | The main brushes cannot turn |
| 5 beeps | “Error 5” | A side wheel is stuck |
| 6 beeps | “Error 6” | The cliff sensors are dirty, Roomba is stuck, is hanging over a cliff, or is on a dark surface. |
| 9 beeps | “Error 9” | The bumper is compressed or the bumper sensor is dirty. |
| None | “Error 10” | A side wheel is stuck or its bumper is not registering obstacles. |
| 11 beeps | None | The bumper is not registering obstacles. Roomba may be stuck in one place. |
| 4 tones | “Please recharge Roomba” | Dead battery |
| None | “Please inspect and clean Roomba’s cliff sensors.” | The cliff sensors are dirty, Roomba is stuck, hanging over a cliff, or is on a dark surface. |
| None | “Please inspect and clean Roomba’s wheels.” | A side wheel is stuck. |
| None | “Please remove and clean Roomba’s brushes.” | The main brushes cannot turn. |
Final Thoughts
No matter how sophisticated a robot vacuum is, the number of filters it has or how well sealed it’s inner workings are, nothing can stop dirt, grime and hair getting into places where they can wreak havoc.
But hopefully, your own “Roomba grind” was cured by one of the more simple cleans.
If you did have to follow some of the guides for a deeper clean then I hope that it worked out well and that you are pleased with yourself for fixing it all on your own.
If you are still determined to fix it, why don’t you post a question in a forum, like this one?